Monday, August 31, 2009

Rebuilding the SWB chassis

Major teardown is finally complete! Now I can start putting her back together. It began from the ground up starting with the new chassis. The old long bed chassis was carried out of the garage and placed on the side of the house. This made a huge amount of room in the garage.
From SWB Chassis Rebuild

Next I placed the new short bed frame in the center of the garage and started reassembling the suspension. I started with the rear by adding several new components. All from my Early Classic Enterprises 4/6 drop kit. It drops the truck 4" in the front and 6" in the rear. I added shock mount relocators and relocated the track bar to the right trailing arm.
From SWB Chassis Rebuild

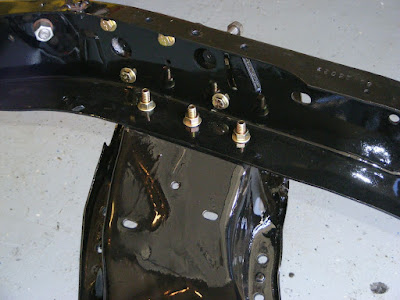
I then bolted the crossmember onto the short frame. It was a perfect fit! Everything lined up nicely.
From SWB Chassis Rebuild

Next I replaced the upper and lower control arm shafts and ball joints. This by far was the hardest part of the suspension rebuild. It was kinda like that move "A Christmas Story". Remember the dad fighting with the furnace, cussing and yelling? That was me! With the shafts in place I could begin reassembling the front suspension. The old spindles were replaced with ECE 2 1/2" drop spindles. I used ECE 1 1/2" drop springs, all new grade 8 nuts and bolts, new brake rotors and calipers. When I finally got it all togther, I stepped back, lit up a cigar and admired my little masterpiece :)
From SWB Chassis Rebuild

Passenger Side:
From SWB Chassis Rebuild

A little elbow grease goes a long way!
From SWB Chassis Rebuild

Drivers sideview:
From SWB Chassis Rebuild

Slideshow of photos. The old rear cover looks out of place. It gets replaced later :)

Clean and Paint

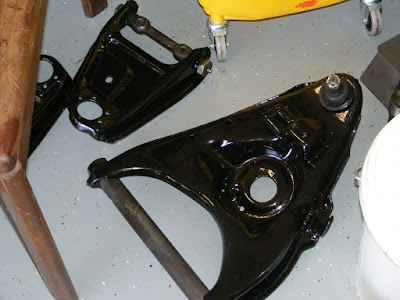
Now it was time for the real fun. Cleaning years of grease and dirt off the suspension components. I used an electric drill, several stripping pads and wire wheels to clean up the rear differential and front control arms. It was a messy job and took a few hours over. Afer cleaning, I wiped everything down with thinnner then painted the parts with POR15. Here is a photo of the control arms after cleanup and paint. The old shafts were later replaced.
From SWB Chassis Rebuild
:

Front Suspension Removal

Now that the motor and transmission have been removed, I started stripping down the old LWB chassis. Before I did anything, I took photos detailing the layout. All 53 photos can be seen here.
I started by removing the brake/fuel lines and emergency brake cable. I then went to work on the front crossmember. An engine hoist was used to support the chassis while the crossmember was unbolted from the frame. A floor jack was used to support the crossmember. I did my best to keep it from slipping off the jack. It eventually did but caused no harm.
From Front suspension removal

With the crossmember was separated from the frame, I started dismantling the front suspension. This posed a problem. Front coil springs are under high tension and can be very dangerous if not removed correctly. Typically the motor and transmission provide enough weight to allow compressing the spring with a floor jack positioned beneath the control arm. With no motor and tranny, I had no weight to compress the spring. After asking questions online I decided to cut the springs with a cutting wheel. It was a little scary cutting thru that first spring. When it finally broke it did so with a very loud, POP! Scared the crap out of me!
From Front suspension removal

Eventually I got everything loose then dismantled the rear suspension which way easier than the front. Here are photos:

Thursday, April 16, 2009

Engine and Tranny Removal

This was by far the easiest motor/tranny removal I have ever done. Of course that's not counting the work to remove the cab and front clip. All I had to do was position the hoist, attach the load leveler, and lift out the motor and tranny as a single unit. I highly recommend using a load leveler when doing this type of work. It allows you to change the center of gravity to keep everything level. Without it, you end of with a pool of tranny fluid on the floor of your garage. Once I had the motor/tranny free from the chassis, I lowered the tranny to rest on the leg of the hoist. I then unbolted the tranny from the motor while balancing it on the hoist. I slid it to the side once it was free. Btw, I made sure to unbolt the torque converter from the flywheel while the motor and tranny were still on the chasis. Next I bolted the engine stand to the motor and lowered it to the floor. I then removed the load leveler and pushed the hoist out of the way so I could begin tearing down the motor. It didn't take long to tear the motor down to a bare block. In doing so I found the #1 cylinder had spun a bearing which explained the knock. Next step is to find a good engine shop here in Austin and have the block prep'd for rebuild.

Tuesday, April 7, 2009

Cab Removal Time!!

With the passenger side rocker complete, I decided to remove the cab to make room for the chassis and motor work. Those two items are the biggest part of the LWB to SWB conversion. The mounted cab prevented me from making any real progress on the chassis. With it removed, I can work on all three.

All the work is happening in my two car garage since my neighborhood HOA forbids working in the driveway. The garage has two separate doors. One side has an opener which sits too low to lift the cab. That confined me to the other side. After thinking it thru I came up with the following plan. At this point the cab is bare except for the empty gas tank. I heard the cab was front heavy so I left it in place. I doubt it made much of a difference.

First I built a cab dolly out of 2x4's. Cost$65. I considered welding a steel frame but felt it was overkill for something I'd use once.

Next I positioned my lift between the wall and cab then setup a 4x4 on wood blocks left over from the cab dolly. I made sure to position the 4x4 as far forward as possible.

With the cab bolted down, I raised the 4x4 to the cab to see where to cut the notches. I used a sawzall to make the cuts.

I then unbolted the four cab bolts and slowly lifted the cab. As the cab came up I expected it to tilt forward but it stayed level. The cab is suprisingly light. Only about 300 lbs.

Once the cab was high enough, I pushed the LWB chassis sideways until it cleared the cab. Tireskates made this easy. I then lowered the cab onto the dolly.

Once the cab was on the dolly, I moved it into the corner of the garage. That gave me enough room to angle the chassis back in place and prepare to remove the engine and tranny.

Rocker Replacement Part 2

So it's been quite a while since my last post and a lot has happen. For the most part the passenger side rocker panel is complete. I still have some finish grinding and a couple small floor holes to weld up.

When I left off in part 1, I had just finished removing the rocker panel. The metal underneath had some serious surface rust. I grinded away the surface rust and painted it with POR15.

Next I made my first there-is-no-going-back cut. I cut off the rusted A-pillar just above the lower door hinge bolt holes. I then cut out the inner kick panel. In the photo below you can also see where I welded in my first floor patch.


With the floor patch in place, I then welded in the new kick panel. It was a bitch getting it to align with the bottom shape of the floor. Mainly due to the shape of the floor patch. I ended up removing the first floor patch and redoing it a couple times before I was satisfied with the work. Sorry I don't have photos of the kick panel prior to installing the A-pillar. I then took the replacement a-pillar, bolted it in place, scribed a cut line, then cut it to fit and welded it in place. As you can see there is a big improvement of the rusted out piece.


Next I mounted the new rocker panel using sheet metal screws. Then one-by-one, I removed each screw and plug welded the hole. When I was done I grinded down the welds.

Tuesday, January 6, 2009

Finally Found a Fleetside Short Box!!

Due to the holidays not much as happened on the 68'. Plus I needed a mig welder. Also it would be nice to know how to weld :) I heard it has a short learning curve. Just takes some guidance and practice. I'll find out soon enough, yesterday I picked up a Hobart Handler 210. Based on reviews it's a great little mig welder. It's a 230 volt model which means I need a 230v plug installed in the garage. I just started looking for an electrician do the install. I hope to have it in place by the weekend.

In other news I finally found a fleetside short box!! It took 2 months to find one. I was just about to give up and see about getting the long bed cut down. Not something I wanted to do so it was a good find. I did not have my camera when it was delivered so no pictures. I hope to get some up soon.